Instanced Static Meshes in UE4 (Part 1/4)
Hello, Instance Meshes
For the very first part of this series, we will make a row of pillars and a floor grid using Instance Mesh Component.
In the following code, I have created an Actor and included the heade for ISMC. Then I have added 3 properties, two for mesh references, one for our component.
Also if you have never heard of OnConstruction, it essentially gets called whenever you move and drop an actor in the world, or change a property.
Useful for programmers, because whenever designer makes changes, this gets fired and we can make our changes here.
// PillarHallActor.h
#include "CoreMinimal.h"
#include "GameFramework/Actor.h"
#include "Components/InstancedStaticMeshComponent.h"
#include "PillarHallActor.generated.h"
// Continued in class body...
public:
// This will be our pillar mesh
UPROPERTY(EditAnywhere, BlueprintReadWrite, Category = "Parameters")
UStaticMesh PillarMesh;
// This will be our floor mesh
UPROPERTY(EditAnywhere, BlueprintReadWrite, Category = "Parameters")
UStaticMesh FloorMesh;
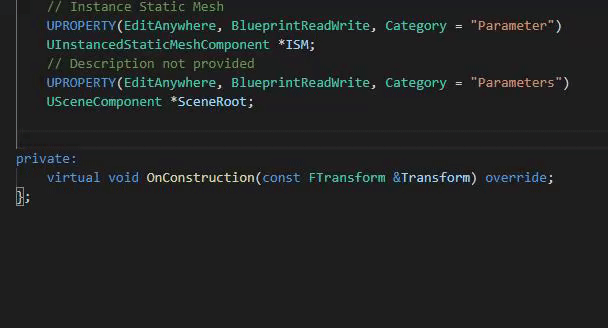
// Instance Static Mesh
UPROPERTY(EditAnywhere, BlueprintReadWrite, Category = "Parameter")
UInstancedStaticMeshComponent *ISMC;
private:
virtual void OnConstruction(const FTransform &Transform) override;We can initialize the ISMC in wither constructor/anywhere else. Recall that CDO is used for Constructors and NewObejct is used anywhere else(post-initialization)
The following code has hints for both. We are going to use NewObject for now.
// PillarHallActor.cpp

#include "PillarHallActor.h"

// Sets default values
APillarHallActor::APillarHallActor()
{
	// Set this actor to call Tick() every frame.  You can turn this off to improve performance if you don't need it.
	PrimaryActorTick.bCanEverTick = true;
	// To initialize in constructor.
    // ISM = CreateDefaultSubobject<UInstancedStaticMeshComponent>("ISM");
}

void APillarHallActor::OnConstruction(const FTransform &Transform)
{
    // We initialized in the body instead of constructor.
	ISMC = NewObject<UInstancedStaticMeshComponent>(this);
	ISMC->RegisterComponent();
	ISMC->AttachToComponent(RootComponent, FAttachmentTransformRules::KeepRelativeTransform);
	ISMC->SetStaticMesh(PillarMesh);
	ISMC->AddInstance(FTransform());
	UE_LOG(LogTemp, Warning, TEXT("You have just changed something from inspector.")); // Print something to yourself.
}
Compile the project. jump into ue4. Drag the actor. Add some meshes. This is what you should see in the inspector.

As you play around with this, you will notice that the meshes from last interaction are not disappearing. In fact, this was a headache to deal with when I had to learn ISMs. This is because we need to clean any references we crreated(In this case, we registered the ISMC and attached it.). It is out responsibility to unregister and clean all references.
The following code does that for all attached ISMC. In later parts, we will add an advanced version of this macro function in a library. For now, this should go before NewObject.
while (this->GetComponentByClass(UInstancedStaticMeshComponent::StaticClass()) != NULL) {
	UActorComponent* cls = this->GetComponentByClass(UInstancedStaticMeshComponent::StaticClass());
	cls->UnregisterComponent();
	cls->DestroyComponent();
	cls->SetActive(false);
}⚠️Warning :
- Your actor might not move around in the scene anymore.
- We did a mistake. Since we don't have a default RootComponent, it automatically picked the first component(our case, the ISMC) and made it root.
- Which means when we deleted that reference, we have our Actor's RootComponent pointing to null.
- Without a valid SceneComponent as root, the actor won't move. We need to fix that.
Fixing RootComponent issue
- Obvious Solution: Explicitly attach components to RootComponent in constructor. Same goes for components made with NewObject too.
- My Recommendation: Always define your SceneComponent as a dummy. Try to avoid using RootComponent which is inherited by default.
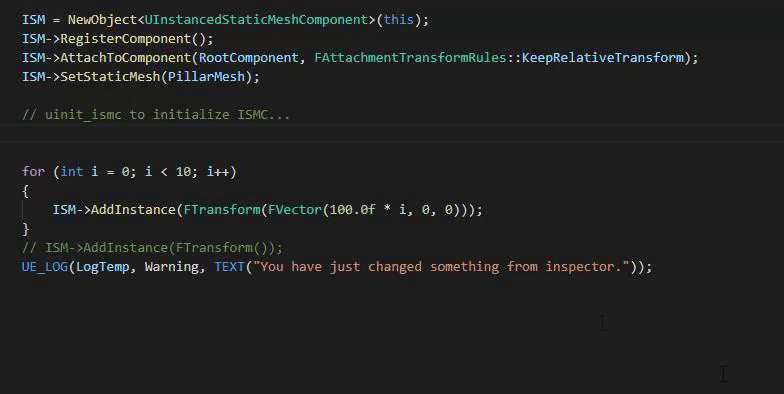
Here's the new(and final) code accounting for this change. I am going to add a simple loop that increments the X distance and adds the instances.
// Lines added to PillarHallActor.h

    // Add this line or similar(in public field)
    UPROPERTY(EditAnywhere, BlueprintReadWrite, Category = "Parameters")
    USceneComponent* SceneRoot; // to replace SceneRoot
private:
    virtual void OnConstruction(const FTransform &Transform) override;


// Lines added to PillarHallActor.cpp
APillarHallActor::APillarHallActor()
{
	// Set this actor to call Tick() every frame.  You can turn this off to improve performance if you don't need it.
	PrimaryActorTick.bCanEverTick = true;
	SceneRoot = CreateDefaultSubobject<USceneComponent>("SceneRoot");
	RootComponent = SceneRoot;

    // Again, IF you initialize in constructor.
    // ISM = CreateDefaultSubobject<UInstancedStaticMeshComponent>("ISM");
	// ISM->SetupAttachment(RootComponent); // NOTE: RootComponent ~ SceneRoot
}

void APillarHallActor::OnConstruction(const FTransform &Transform)
{
    // There is a useful refactoring we'll cover in next part. We dont need all this repetition...
	while (this->GetComponentByClass(UInstancedStaticMeshComponent::StaticClass()) != NULL)
	{
		UActorComponent *cls = this->GetComponentByClass(UInstancedStaticMeshComponent::StaticClass());
		cls->UnregisterComponent();
		cls->DestroyComponent();
		cls->SetActive(false);
	}

	ISM = NewObject<UInstancedStaticMeshComponent>(this);
	ISM->RegisterComponent();
	ISM->AttachToComponent(RootComponent, FAttachmentTransformRules::KeepRelativeTransform);
	ISM->SetStaticMesh(PillarMesh);

    // The promised loop. You can attach a variable and play around in the inspector.
	for (int i = 0; i < 10; i++)
	{
		ISM->AddInstance(FTransform(FVector(100.0f * i, 0, 0)));
	}
	// ISM->AddInstance(FTransform());
	UE_LOG(LogTemp, Warning, TEXT("You have just changed something from inspector."));
}
Check-In 📋
- You should have a line of Instanced pillars. Try the grid part yourself. Try some parameters.
- The extra
SceneRootcomponent is a neat little trick to avoid silly mistakes. Do consider adding it when creating Actors.

In the next part, we will use multiple ISMC (each with separate mesh) to populate a straight wall with variations.
See you later... 🖐
VSCode plug-in
If you are using VSCode, you will love this snippet/terminal plug-in. I am planning lots of features to add. Here are some examples how easy it is to use.
You can use uprop to create public properties. uprop_ro to create readonly properties.
Also, snippets for code we are going to use a lot in this series. Below shown uinit_ismc.
Related Contents
User created content used in WW APIs completely free. If you develop something cool using the tools, you can send us to be showcased here.
Community


Thank you for visiting!
Hope you got the resources you needed. Come visit again :)
I upload weekly and revamp bi-monthly. You can support my work at Patreon | Paypal | Marketplace | Gumroad